How to Clean a Mechanical Mouse – Step by Step Guide
Ever thought about keeping your mechanical mouse in top shape? These mice are still favorites for many, despite the rise of optical mice. But, those small balls can get dusty, causing slow cursor movements and lag. Don’t worry, I’ve got you covered! This guide will walk you through how to clean your mechanical mouse and keep it running smoothly.
Key Takeaways
- Cleaning a mechanical mouse takes around 10 minutes, longer than the 5 minutes required for an optical mouse.
- Mechanical mice have internal rollers that need regular cleaning to prevent dust and debris buildup.
- Optical mice use a light sensor (photodiode) to detect movement, making them less prone to maintenance issues.
- Proper cleaning techniques can extend the life of your mechanical mouse and ensure smooth, accurate cursor control.
- Regular maintenance, such as a quick clean once a week, is recommended to keep your mechanical mouse in top shape.
Why Cleaning a Mechanical Mouse is Important
Keeping your mechanical mouse clean is key for its best performance and life span. These mice easily collect dust, dirt, and debris. This buildup can mess with their accuracy and speed. Regular cleaning helps your mouse move smoothly, fixes problems like sticky mouse or troubleshooting mouse issues, and makes your mouse maintenance guide last longer.
Benefits of Regular Cleaning
Regular cleaning of your mechanical mouse has many advantages:
- It makes your mouse track better and move the cursor smoothly.
- It keeps your mouse germ-free. A mouse can have up to 1,600 bacteria per square inch.
- It helps your mouse last longer by stopping grime and debris from causing damage.
Signs Your Mouse Needs a Clean
Knowing when your mechanical mouse needs a clean is important. Look out for these signs:
- If your cursor moves erratically or jumps around.
- If buttons or the scroll wheel don’t work right or feel sticky.
- If your mouse doesn’t track well, especially on certain surfaces.
If you see any of these problems, it’s time to clean your mouse. This will fix any issues and make it work better again.
Tools Needed for the Cleaning Process
To keep your mechanical mouse in top shape, you need the right tools. Let’s look at the essential items for a thorough clean.
Essential Cleaning Supplies
You’ll need a non-abrasive microfiber cloth or cleaning wipes, a mild cleaning solution, and a soft-bristled brush or cotton swabs. Also, a can of compressed air is helpful. But, avoid isopropyl alcohol as it can harm your mouse.
Proper cleaning is key to keeping your mouse in good condition. It ensures your mouse stays clean and works well.
Recommended Brushes and Cloths
- Soft-bristled brushes: These gentle tools help remove dust and debris without damaging your mouse.
- Lint-free microfiber cloths: These cloths clean the mouse’s extehttps://darrelaffiliate.com/wp-content/uploads/2024/12/vintage-electrical-and-electronic-appliances-in-an-2023-11-27-05-10-10-utc-e1734923695564.jpgr without leaving residue or fibers.
With the right tools, you can keep your mechanical mouse in great shape. This ensures it works smoothly for many years.
Step-by-Step Guide to Disassemble Your Mouse
To keep your mechanical mouse in great shape, you need to clean its inside parts. This guide will show you how to take apart your mouse. You’ll learn how to maintain a mechanical mouse and use better mouse cleaning techniques.
Removing the Mouse Ball
Start by taking out the mouse ball. Find the cover on the mouse’s bottom and turn it counterclockwise. Then, pull out the mouse ball and put it aside for cleaning.
Accessing the Internal Components
To get to the mouse’s inside parts, you need to remove screws. These screws are usually under the mouse’s feet or in the battery area. Carefully open the mouse’s panels without harming any parts.
- Use small screwdrivers to take out the screws that hold the panels.
- Pry the panels apart gently, remembering how they fit for when you put them back.
- Disconnect any cables or wiring to fully separate the mouse’s parts.
Now that the mouse is apart, you can clean its inside parts. Always follow the maker’s instructions and be careful not to damage any sensitive parts during the mouse maintenance guide process.

Cleaning the Intehttps://darrelaffiliate.com/wp-content/uploads/2024/12/vintage-electrical-and-electronic-appliances-in-an-2023-11-27-05-10-10-utc-e1734923695564.jpgr of the Mouse
Keeping your mechanical mouse’s inside clean is key for its smooth work and long life. While cleaning the outside is a big job, the inside parts need care too. Let’s look at how to clean the mouse’s inside and fix any problems.
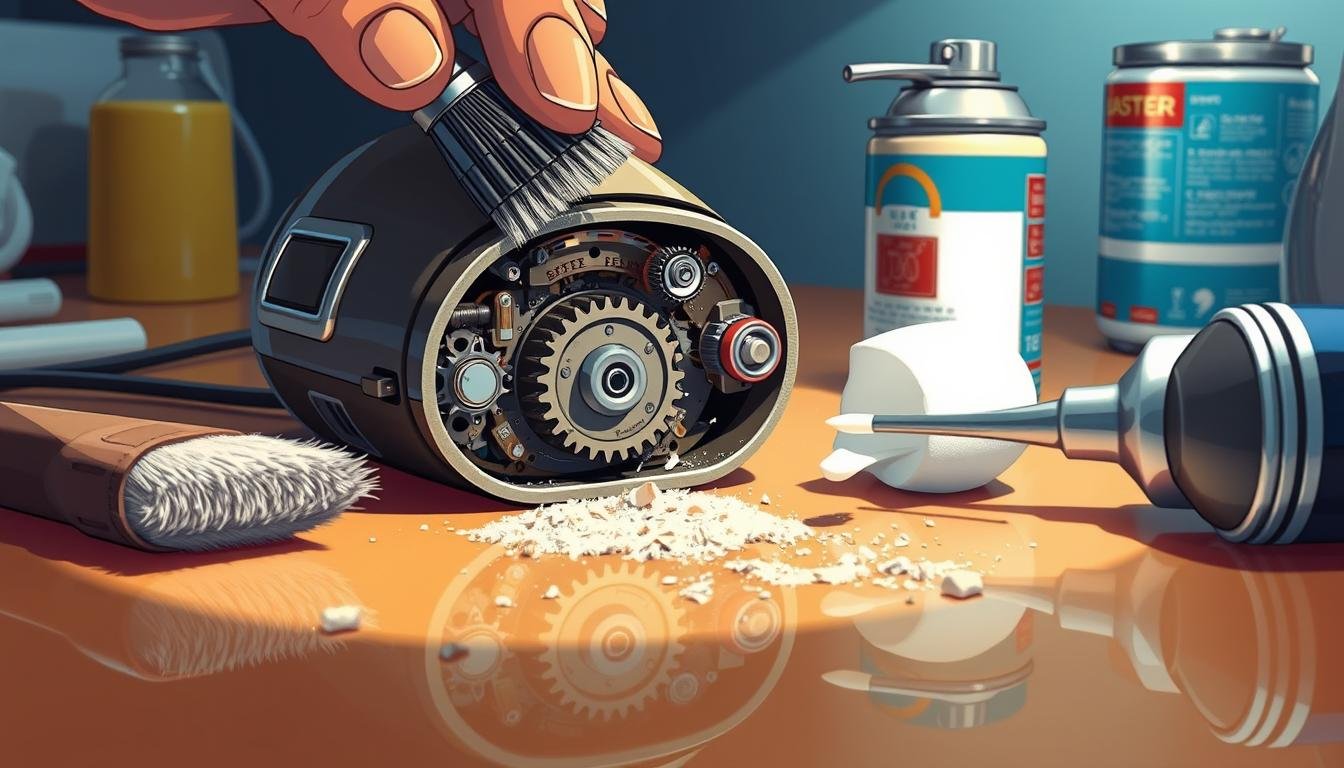
Wiping Down the Circuit Board
Start by cleaning the circuit board inside your mouse. Use compressed air to blow out dust and dirt. Don’t hold the can too close to avoid harming the tiny parts. Then, use a soft-bristled brush or cotton swab to wipe the board clean.
Cleaning the Mouse Roller Balls
The mouse’s rollers help move your hand into cursor movements on the screen. They can get dusty and sticky over time. Clean the roller balls with a dampened soft tissue or cotton swab. Roll them gently to clean all sides. But be careful not to use too much alcohol, as it can harm the electronics.
By cleaning the inside parts, like the circuit board and roller balls, you can fix a sticky mouse, troubleshoot mouse issues, and keep your mouse cleaning tutorial running smoothly. A little effort here can make your mouse work better and last longer.
“A clean mouse is a happy mouse, and a happy mouse means a happy user.”
How to Clean the Mouse Ball
Keeping your mechanical mouse in top shape is key for great performance. Cleaning the mouse ball is a must. It gets clogged with dust, hair, and more. We’ll show you how to clean and replace the mouse ball for better function.
Properly Removing and Cleaning the Ball
Start by gently removing the mouse ball. Find the retaining ring or cover and twist it counterclockwise. Use a soft, lint-free cloth or tissue with mild cleaning solution to clean the ball. Make sure to remove all dirt and grime.
Avoid using harsh chemicals or abrasive materials. They can damage the ball and hurt its performance.
Drying and Replacing the Mouse Ball
Let the mouse ball dry completely after cleaning. Once dry, put it back in the mouse. Make sure it’s seated right. Replace the retaining ring or cover by twisting it clockwise.
Test the mouse to see if it’s working well. If the ball rolls smoothly, you’re good to go.
By following these mechanical mouse cleaning hacks, you can keep your mouse running well. Regular mouse hygiene tips like these help keep your workspace clean. They also make your computing experience better.
Keeping the Mouse Casing Clean
Keeping your mechanical mouse’s casing clean is as important as its internal parts. Regularly wiping the mouse’s outside helps keep it looking good and lasting longer. Here are some tips to keep your mouse’s casing clean.
Disinfecting the Extehttps://darrelaffiliate.com/wp-content/uploads/2024/12/vintage-electrical-and-electronic-appliances-in-an-2023-11-27-05-10-10-utc-e1734923695564.jpgr
When cleaning the mouse’s outside, don’t use alcohol. It can harm the mouse’s finish. Instead, use a mild soap or electronic cleaning wipes. Wipe the mouse gently, focusing on the seams and corners where dirt builds up.
Tips for Avoiding Damage
- Use a microfiber cloth or a soft, lint-free cloth to wipe down the mouse’s casing. Avoid using paper towels or abrasive materials, as they can scratch the surface.
- Dip a toothpick or a soft-bristled brush in the cleaning solution and use it to gently dislodge any stubborn dirt or debris that has settled in the seams and crevices of the mouse.
- Utilize compressed air to expel dust and particles from hard-to-reach areas, such as the scroll wheel and the scroll wheel’s housing.
- Be cautious when cleaning the optical sensor or laser lens, as these sensitive components can be easily damaged. Consult your mouse’s manufacturer’s instructions for the proper cleaning method.
By following these simple mouse cleaning techniques and mouse hygiene tips, you can keep your mechanical mouse looking great and working well. This ensures it will serve you for many years.

Reassembling Your Mechanical Mouse
Properly reassembling your mechanical mouse after cleaning is key to its best performance. A few simple steps will get your mouse working smoothly again. This ensures a seamless user experience.
Step-by-Step Reassembly
Start by putting the mouse ball back if you took it out. Make sure all parts fit right and are in place without forcing. Put back any panels or covers, securing them with the screws you removed.
This keeps your mouse strong and in good shape.
Testing the Mouse After Cleaning
After putting everything back, let the mouse dry for about 2 minutes before using it. This avoids problems with wet parts. Move the mouse and click all buttons to check it works well.
If issues arise, check your reassembly and fix them. Regular mouse maintenance is vital for optimizing mouse performance and troubleshooting mouse issues. Cleaning and reassembling your mouse right can make it last longer and work better.
“Keeping your computer mouse clean and well-maintained can significantly improve its performance and longevity.”
Tips for Maintaining Your Mechanical Mouse
Keeping your mechanical mouse in good shape is key for its best performance and long life. By following a few easy tips, you can make sure your mouse works well for many years.
Cleaning Frequency Recommendations
It’s smart to clean your mouse quickly once a week and more deeply every month. This cleaning schedule helps stop dirt, dust, and other stuff from messing with your mouse’s work.
Other Maintenance Best Practices
- Avoid eating or drinking at your desk to prevent spills and crumbs on your mouse.
- Keep pets away from your desk to stop their fur and dander from getting on your mouse.
- Use a microfiber cloth to clean up spills or crumbs right away, so they don’t get stuck in the mouse.
- Think about using a mouse pad to cut down on dirt and grime on the mouse’s bottom.
By sticking to these mouse maintenance guide and mouse hygiene tips, you can make sure your mechanical mouse stays in great shape. This way, it will keep working well for a long time.
“Regular cleaning is the key to keeping your mechanical mouse in top shape. A little bit of effort goes a long way in maintaining the performance and longevity of your device.”
Troubleshooting Common Issues After Cleaning
After cleaning your mechanical mouse, you might face some problems. Don’t worry, with patience and effort, you can fix these issues. Let’s look at some common problems and how to solve them.
Mouse Not Working Properly
If your mouse doesn’t work right after cleaning, check if everything is put back together right. Make sure the mouse ball is in place and the inside parts are clean. Sometimes, cleaning can move parts around, so you might need to put them back gently.
Unresponsive Buttons and Solutions
Debris under the mouse buttons can make them not work. Use compressed air to clean out any dust. If it still doesn’t work, check if your mouse is connected to your computer and if the drivers are updated. For optical mice, clean the sensor lens with a dry cotton swab.
If you can’t fix the problem, your mouse might be old or broken. In that case, you should contact the manufacturer or think about getting a new mouse.