Best Way to Clean Your Computer Mouse – Step by Step Guide
Do you find your computer mouse slow and unresponsive? It might be because of dirt and debris that have built up. Cleaning your mouse right is key to keeping it working well and lasting longer. But, what’s the best way to clean a computer mouse? Let’s find out the important steps to make your mouse shine.
Key Takeaways
- Use compressed air, a lint-free cloth, and alcohol wipes for effective mouse cleaning
- Take apart the mouse for a deep clean, if needed
- Stay away from sharp objects that can harm the mouse’s parts
- Clean your mouse regularly to stop dirt from piling up
- Cleaning your mouse well can make it work better and last longer
Why Cleaning Your Computer Mouse is Important
Keeping your computer mouse clean is key to good mouse care. A clean mouse works better, lasts longer, and keeps your area clean. If you ignore mouse hygiene, it can harm your mouse’s performance. This can slow you down at work.
Benefits of a Clean Mouse
A clean mouse has many benefits:
- It tracks better: Dirt can mess with the sensor or trackball, making the cursor jump around.
- It moves faster: A clean mouse glides smoothly, making it easier to use your computer.
- It lasts longer: Cleaning it often stops wear and tear, making your mouse last longer.
- It’s cleaner: Cleaning your mouse regularly keeps your workspace germ-free.
How Dirt Affects Performance
Dirt on your mouse can really slow it down. Dust and crumbs can block the sensor or mess with the trackball. This makes the cursor act weird, slowing you down. Keeping your mouse clean is vital for good mouse hygiene and smooth computer use.
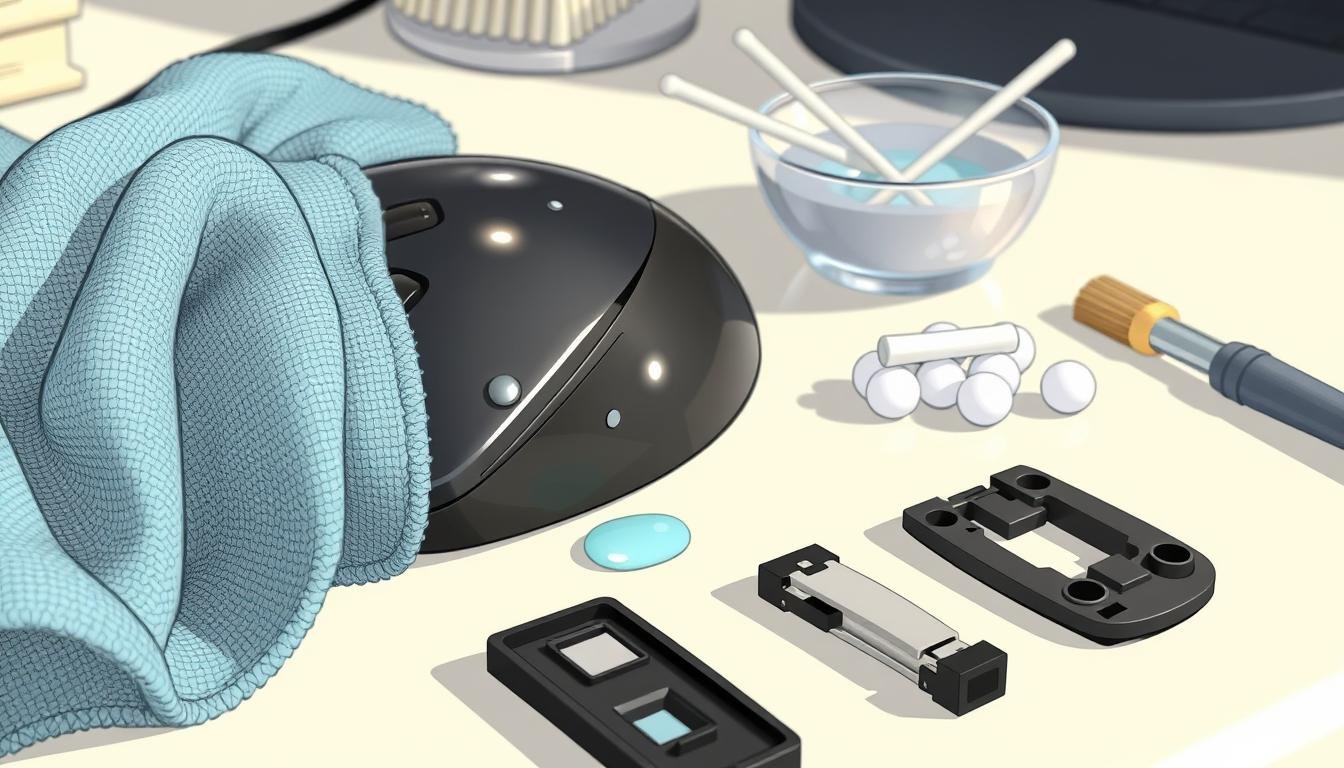
What You Need to Clean Your Mouse
Keeping your computer mouse clean is key for its performance and life span. You’ll need some basic items to clean it well. Here’s what you should get and some extra tools that can help.
Recommended Cleaning Supplies
- Microfiber cloth: This soft, lint-free cloth is perfect for gently wiping down the extehttps://darrelaffiliate.com/wp-content/uploads/2024/12/vintage-electrical-and-electronic-appliances-in-an-2023-11-27-05-10-10-utc-e1734923695564.jpgr of your mouse.
- Cotton swabs: Use these to reach into the nooks and crannies of your mouse, removing any accumulated mouse cleaning tools.
- Isopropyl alcohol (70% concentration): This is the go-to solution for cleaning the internal components and sensors of your mouse.
- Mild soap and lukewarm water: Create a gentle cleaning solution to wipe down the surface of your mouse.
- Compressed air: This handy tool can blow away dust and debris from hard-to-reach areas.
- Toothpicks: Use these to carefully remove any stuck-on mouse cleaning solutions or debris.
Optional Tools for a Thorough Job
While the basics should cover most cleaning needs, some extra tools can help more:
- Small screwdriver set: Allows you to disassemble your mouse for a deeper clean, if necessary.
- Tweezers: Useful for grasping and removing any stubborn particles or debris.
Avoid using ammonia-based cleaners or harsh chemicals. They can harm your mouse’s coatings, paint, and details. Use only the recommended mouse cleaning tools and mouse cleaning solutions for the best results.
With the right tools and effort, you can keep your mouse in great condition. This ensures it works well for many years.
Preparing Your Workspace for Cleaning
Before you start cleaning your computer mouse, make sure your workspace is ready. A few simple steps can help you clean safely and efficiently. This way, your mouse will look and work its best.
Choosing the Right Area
Find a clean, well-lit area with enough space to work. Use a desk or table with a soft, clean towel as your work surface. This prevents scratches or damage to your mouse. Keep the area clutter-free and distraction-free to focus on cleaning.
Gathering Your Supplies
Get all your cleaning supplies ready before you start. You’ll need a microfiber cloth, a soft-bristled brush, and compressed air if needed. Also, have any cleaning solutions or tools you’ll use. Having everything ready makes the cleaning process easier and faster.
If your mouse is wired, unplug it first. For wireless mice, take out the batteries to avoid any problems. Now, your workspace and supplies are ready. You can start the step-by-step guide to clean your best way to clean your computer mouse.
Steps to Clean Your Optical Mouse
Keeping your optical mouse clean is key for it to work well. Follow these easy steps to clean your mouse and keep it running smoothly.
Disconnecting the Mouse
First, unplug or turn off your mouse. This keeps you safe and stops any damage while you clean.
Cleaning the Extehttps://darrelaffiliate.com/wp-content/uploads/2024/12/vintage-electrical-and-electronic-appliances-in-an-2023-11-27-05-10-10-utc-e1734923695564.jpgr
Use a damp, lint-free cloth to wipe the mouse’s outside. Don’t soak it, as too much water can harm the inside. For tough spots, use a cotton swab with a bit of isopropyl alcohol.
Cleaning the Sensor
The optical sensor is vital. Use a can of compressed air to remove dust. If it’s still dirty, use a cotton swab with isopropyl alcohol.
Don’t use household cleaners or solvents. They can ruin your mouse’s parts.

By cleaning your mouse this way, it will work better and last longer. Cleaning regularly helps you have a better experience with your mouse.
Steps to Clean Your Ball Mouse
Keeping your ball mouse clean is key for its best performance and life span. Whether it’s an old mechanical mouse or a new trackball, cleaning it often makes a big difference. Here’s how to keep your ball mouse in great shape.
Disassembling the Mouse
The first step is to take apart your ball mouse. Find the ball cover, usually a cap or lid, and twist or pop it off gently. This lets you see the mouse’s inner parts, including the ball.
Cleaning the Ball and Socket
Now that the ball is out, clean it with an alcohol wipe or a damp, lint-free cloth. Turn the ball to clean all sides and get rid of dirt or debris. Then, use compressed air to clean the socket and rollers. Use a cotton swab to get rid of any stuck debris in the small spaces.
Reassembling the Mouse
Once everything is clean and dry, it’s time to put the mouse back together. Put the ball back in the socket and put the ball cover on. Make sure the ball moves easily without any blockage.
By following these easy steps, you can make your ball mouse work better. Cleaning it regularly will not only make it more enjoyable to use but also make it last longer.
Cleaning Mouse Cables and Connectors
Keeping your mouse cable and connectors clean is as important as cleaning your mouse. If you ignore these parts, you might face connection problems, poor performance, or even damage. We’ll show you how to clean your mouse cable and maintain your connectors.
Detaching the Cable Safely
First, disconnect your mouse cable from your computer. Carefully unplug it to avoid damaging the connectors. Check the cable for any wear, like fraying or cracks, before you start.
Wiping Down Connectors
Now, clean the connectors. Use a dry cotton swab or compressed air to remove dust. Don’t use wet cleaners to avoid short circuits or corrosion. Make sure the connectors are dry before you plug them back in.
To clean the cable, use a damp, lint-free cloth. Don’t bend or twist it too much. Let it dry completely before you use it again.
By following these steps, you can keep your mouse cable and connectors in great shape. This will help your peripherals last longer and ensure a smooth computing experience.
Tips for Cleaning Wireless Mice
Keeping your wireless mouse clean is key for its best performance and life span. Cleaning your mouse requires some special care, especially with its wireless design.
Battery Removal and Precautions
The first thing to do is to take out the batteries before cleaning. This protects the mouse’s electronics. Open the battery compartment and remove the batteries. Then, use a dry cloth or compressed air to clean inside.
Specific Areas to Focus On
- Scroll Wheel: The scroll wheel collects a lot of dirt and dust. Clean it with a cotton swab dampened with isopropyl alcohol.
- Side Buttons: Clean the side buttons too, as they can get dirty. Use a soft, lint-free cloth to wipe them.
- Bluetooth Pairing Button: Make sure to clean the Bluetooth pairing button area. This ensures a good connection.
Always avoid moisture in your mouse’s electronics. Use a compressed air canister to clean hard-to-reach spots safely.
“Keeping your wireless mouse clean is crucial for its longevity and optimal performance. Take the time to properly maintain it, and you’ll enjoy a smooth, responsive experience for years to come.”
Deep Cleaning: Frequency and Techniques
As a computer user, I know how key it is to keep your mouse clean. Regular cleaning stops small problems. But, a deep clean every 3-6 months or when issues pop up can make your mouse last longer and work better.
When to Perform a Deep Clean
Using your mouse a lot can cause dirt, dust, and debris to build up. This can mess with the sensor and make your cursor jump around. So, I suggest a deep clean every 3-6 months or when your mouse starts to slow down.
Techniques for a Deeper Clean
For a deep cleaning mouse, take it apart if you can, following the maker’s instructions. Use cotton swabs and isopropyl alcohol (70% or higher) to clean hard spots. Compressed air is great for getting rid of stuck particles inside.
For gaming mice, focus on buttons and scroll wheels since they get used a lot. A clean mouse improves your computer and gaming experience.
“A clean, well-maintained mouse can significantly enhance your overall computing experience and gaming performance.”

Adding these deep cleaning steps to your mouse care routine will make your cursor move smoothly and your mouse last longer. A bit of time and effort in deep cleaning mouse and thorough mouse maintenance can really help keep your mouse in top shape.
Maintaining a Clean Mouse
Keeping your computer mouse clean is key for its long life and best performance. By cleaning regularly and using the right methods, you can stop dirt from building up. This ensures your mouse works well for many years. Here are some top tips to keep your mouse clean and working great.
Regular Cleaning Schedule
Having a regular cleaning plan is important for a clean mouse. I suggest wiping your mouse with a microfiber cloth once a week. This simple step can remove dust, dirt, and fingerprints from your mouse’s surface.
Best Practices to Avoid Dirt Build-Up
- Use your mouse on clean, dry surfaces to minimize the transfer of dirt and grime.
- Store your mouse in a dust-free area when not in use to prevent the accumulation of particles.
- Clean your hands before using the mouse to reduce the amount of oil and dirt you transfer to the device.
- Consider using a mouse pad to create a barrier between your mouse and the surface, reducing direct contact with potential contaminants.
By following these tips, you can clean your mouse less often. This means a smoother and more responsive experience. A clean mouse not only works better but also lasts longer. This saves you time and money in the long run.
“Maintaining a clean mouse is essential for optimal performance and longevity. A few simple steps can make a world of difference in keeping your device in top shape.”
What to Avoid When Cleaning Your Mouse
Cleaning your computer mouse is key to keeping it working well. But, there are mistakes to avoid for a safe and effective clean. As someone who uses computers a lot, I’ve learned the hard way. Here are some things to avoid when cleaning your mouse:
Harmful Cleaning Products
- Avoid harsh chemicals like bleach, ammonia, or alcohol-based cleaners. They can harm your mouse’s sensitive parts.
- Stay away from abrasive materials like steel wool or scouring pads. They can scratch your mouse and affect its function.
- Never soak your mouse in liquid. It can damage the internal electronics.
Improper Techniques
- Don’t spray water directly on your mouse. It can get into the openings and sensors, causing damage.
- Don’t use too much force or scrub hard when cleaning. It can dislodge parts or leave scratches.
- Don’t use hair dryers, heat guns, or high heat to dry your mouse. It can warp or damage the internal parts.
By avoiding these common mistakes and using safe, recommended techniques, you can keep your mouse in great shape. This ensures a smooth, responsive experience for all your tasks, from gaming to work. Remember, a clean mouse is a happy mouse!
When to Replace Your Mouse
As a seasoned computer user, I’ve learned that a well-maintained mouse is crucial. But, even the best care can’t last forever. So, how do you know when it’s time for a new mouse? Let’s look at the signs that it’s time to upgrade your mouse replacement.
Signs of Wear and Tear
One clear sign is when your mouse buttons stop working or stick. If you have to click a button many times, or if it feels stuck, it’s a sign of wear. Also, if your cursor jumps around the screen, it’s time for a new mouse.
Markers for Replacement
Physical damage is another clear sign. Look for cracks, missing or worn-down feet, or a frayed cable. These problems can hurt your mouse’s performance and your computer’s safety. Wireless mice have their own issues, like a battery that doesn’t last long, which means it’s time for a new one.
Even the best mice will eventually need to be replaced. Paying attention to wear and tear helps keep your computing smooth. Don’t wait to get a new mouse when it’s needed. Your productivity and comfort will appreciate it.
Conclusion: Enjoy a Cleaner, Better-Performing Mouse
Recap of Cleaning Benefits
Keeping your computer mouse clean is crucial. It makes your cursor move more accurately and your mouse more responsive. This leads to a better user experience.
Regular cleaning also makes your mouse last longer. This can save you money over time. Plus, a clean mouse helps keep your workspace germ-free, improving your health.
My Personal Experience with a Clean Mouse
After cleaning my mouse, I noticed a big difference. The cursor moved more smoothly, and scrolling was easier. My hands didn’t get as tired when using it for a long time.
I strongly suggest cleaning your mouse well. It will make your mouse more comfortable and last longer. It’s a small effort for big benefits.